Introduction
Millions of people worldwide suffer from back pain. It can cause great distress. Fortunately, yoga sequences can offer relief! This article will provide insight into the effectiveness of yoga for treating back pain. We’ll also explain the science behind the restorative poses.
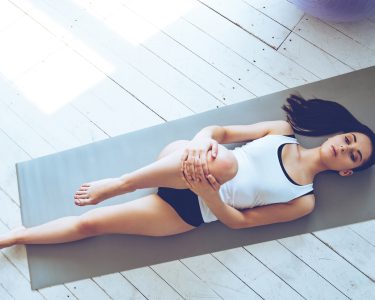
Benefits of Yoga for Back Pain Relief
Yoga exercises can help provide relief from back pain. Regular practice will bring healing and balance to the body. It improves posture, which is necessary for those with chronic pain. Asanas build muscle strength, flexibility, and coordination. They also help with proper alignment for those with trauma or strain. Additionally, yoga deepens your connection to your breath and mindfulness. This reduces psychological stress which may contribute to physical pain.
To begin a yoga regimen, it’s important to find a qualified instructor who specializes in therapeutic practices. An instructor should adjust poses to fit student bodies and ensure comfort while stretching.
Postures
Tired of enduring chronic or acute back pain? Yoga poses can be life-changing. Let us guide you through! We’ll tell you which postures are ideal for relieving your back ache. Plus, we’ll give you tips on how to do them properly and safely. Read on and find out more!
Cat and Cow
Cat and Cow are two calming backbends. They stretch and open the back. They are also calming for the mind and body.
To do Cat pose, start on all fours. Keep hands beneath shoulders and knees under hips. Slowly exhale, arching lower back. Draw head towards chest and round shoulders. Engage abs while pressing down through palms. Hold for 5 breaths. Gradually inhale, releasing into Cow pose.
Cow pose increases flexibility in the spine. It reduces tension and stress in the upper and lower back. Start off in a tabletop position. Gradually inhale, lifting through the chest. Gently lift or tip tailbone towards the sky. Draw shoulder blades down away from ears. Release after 5 breaths. Enjoy the fullness of both postures.
Downward Dog
Downward Dog, or Adho Mukha Svanasana in Sanskrit, is a famous yoga pose. It energizes and tones your body while improving flexibility.
To start, kneel on the ground. Place your hands a bit ahead of your shoulders. Activate your abdominals and extend your spine as you pedal out your feet. Then press down with all parts of your hands, fingers spread wide.
Lift your head towards the sky and press down with all four sides of each foot evenly. Make sure your hips are square to the front. Keep a slight bend in the knees during exhalation for spinal release. Relax your neck, jaw, and eyes for deeper restorative benefits.
Child’s Pose
Child’s Pose is an incredibly restorative pose. It relieves lower back pain by elongating the spine and releasing tension in the lower back, hips, and legs. It also helps posture, energy levels, and balances emotions.
To perform this pose:
- Start on all fours. Place your hands slightly in front of your shoulders and your knees wider than hip-width apart. Take a deep breath.
- Slowly bow forward. Lower your chest toward the floor. Keep your hips above your knees. Reach out with both arms straight ahead or clasp them behind your back. Shift weight from side to side until comfortable. Lengthen your spine. Relax for 5–10 breaths.
- Come up slowly to a seated position. Counter poses such as Cat/Cow or Upward Salutation can be done.
Cobra
Cobra is a yoga pose to strengthen the spine and back muscles, as well as improve posture and flexibility. Lie on your stomach and extend arms, chest and neck. Then, lift your head off the floor and arch your back. This pose is often used in vinyasa practice to transition from one pose to another.
It’s important not to overstretch or strain the lower back. Keep shoulders down and away from ears. Squeeze shoulder blades together to lift higher with less strain. Breath deeply for two to five minutes and practice three times per week for the best results.
This pose creates space between vertebrae. It can help reduce pins-and-needles sensations caused by tight muscles or discs out of alignment. For beginners, a modified version like Pose of Child may be better if discomfort occurs.
Bridge
Bridge is a posture to gain strength in the core and back. It also increases stability and flexibility. Lie on your back with feet apart, hip-width. Bring both hands behind your head and bend your elbows. Use your torso muscles to raise your body until you form a gentle bridge. Press into your feet. Hold this pose for 20 seconds. Then slowly lower your body.
This pose strengthens low and mid-back muscles. It also relieves low back pain, releases tension, and improves circulation. Repeat 1-2 times more if desired.
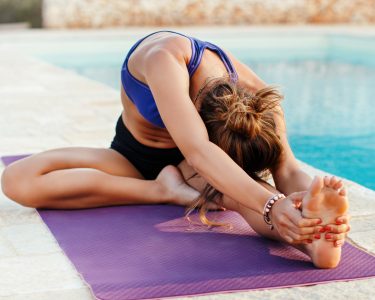
Seated Spinal Twist
The seated spinal twist is a classic yoga pose used to relieve back pain. It helps loosen the torso and spine, open the chest, and improve digestion.
To start, sit on the ground or a mat with your legs in front. Bend your right knee, crossing it over your left. Plant your feet firmly on the floor, with both sitting bones evenly grounded. Place one hand behind you, gripping part of the mat. Stretch your opposite arm up to the sky in a side-body stretch. Gently turn your torso to the right. Rest your right hand on your bent knee – or further down to the ground beside it.
Breathe into the twist and hold for four to six breaths. Then repeat it on the other side. You can recline backwards slightly for an even more comfortable stretch. When done, sit upright and take a big inhale. Exhale as you slowly return to a seated position. Do this at whatever level of challenge or ease that’s appropriate for you.
Sequences
Don’t forget: transforming your yoga practice can really help with back pain. It’ll reduce tension, plus it’ll improve flexibility, strength, and stability.
In this article, we’ll look into sequences that make finding relief easier. Let’s go! We’ll see how these sequences will get you the back pain relief you need:
Morning Sequence
If your back’s feeling stiff and achy but you don’t have time for a full yoga practice, this quick morning sequence is the ideal way to get moving.
- Start in a comfy seated pose like Sukhasana (Easy Pose).
- Focus on your spine, shoulders, and neck. Take some deep breaths to help you relax and let go of tension.
- Stretch out the sides of your heart with spinal twists. Take one hand looped around the outside of the knee, and the other arm reaching out on its side. Avoid putting pressure into the shoulder. Alternate sides several times. Move with your breath.
- Open your chest with arms clinging onto opposite elbows behind you. Arch your upper back and sink into a backbend like Marjariasana (Cat-Cow). With each inhalation, press through both hands and look upward. With each exhalation, press down through all four corners of hands, allowing more weight on forearms rather than wrists.
- Then go into Utkatasana (Chair Pose). Hold firm but not strain or push too hard.
- Come back up towards seated position with legs crossed. Pick up the knee closest one to head for Janu Sirsasana (Head-to-Knee Pose). Move at an appropriate pace for you.
- Make each move part of a fluid breath-inspired practice to energize your body first thing in the morning!
Evening Sequence
Evening is the perfect time to practice yoga to help reduce back pain that might have built up during the day. The following sequence helps support restful sleep and works to restore balance to the body. Here, we focus on length and nourishment, moving away from the yang energy of daytime activities. This allows us to release tension, reduce inflammation, and open up energy pathways.
Take gentle inhales and exhales when beginning each pose. Let your breath move you further into the posture and then out of it at its own pace. Spend plenty of time to allow your body to find its own way in – there’s no rush! Listen to your body and allow yourself to receive the benefits from each pose.
- Child’s Pose: Start on hands and knees with arms stretched out on either side. Hands should be touching the mat. Relax hips towards heels and have brow rest on ground or block. Keep arms a little wider than head, and shoulders relaxed down towards ground. Feel elongation in spine towards tailbone and breathe deeply. Release lower back pain.
- Reclined Butterfly: Lie on back with feet hip width apart and knees bent. Press soles of feet together and let thighs and hips melt into ground. Rest arms by sides or however comfortable. Place a sheet or blanket (optional) right beneath top. Connect breath with gentle movements (ankles and knees can rock side to side or move gently). Flex toes and ankle joints. Breathe deeply to release lower back pain.
- Cat/Cow Variation: Begin on hands and knees. Inhale and arch spine up towards ceiling. Tilt pelvis posteriorly. Exhale and round spine downwards towards floor. Tuck head and chin. Inhale and look up. Exhale and return chin towards chest. Roll shoulders back and down away from ears. Neck should relax. Maintain pattern for 8 breaths and work with natural rhythm. Focus on relief of lower back pain.
- Happy Baby Pose: Lie supine with legs shoulder width apart. Bend knees and bring them onto outside edge of chest. Gently grab tops of feet. Use hands to draw lower leg downwards, opening inner thigh and hip area. Soften shoulders onto floor if any extension. Use light blanket or strap to support legs when holding. Sit bones should release closer to Earth. Breathe slowly inside. Lower back should release further tension within spine. Feel a sense of spaciousness coming through pelvic region. Gradually let go deeper over time. Stay up to 10 breaths.
Intense Sequence
This intense sequence focuses on strengthening your core and lower back muscles. It’s a great way to experience the benefits of transformative yoga and can even help relieve chronic lower back pain.
Poses in this sequence are held longer and there is more focus on precision and body alignment. Not only will it strengthen your core and stabilizing muscles, but it can also help you become more mindful of your body. Pay attention to all sensations, shifts, or changes in energy in your body. Relax deeply into each pose to get the most out of this practice.
The poses in this sequence include:
- Balasana (Child’s Pose)
- Supta Padangusthasana (Reclining Hand-to-Big-Toe Pose)
- Prasarita Padottanasana (Wide-Legged Forward Bend)
- Ustrasana (Camel Pose)
- Navasana (Boat Pose)
- Dhanurasana (Bow Pose)
- Salabhasana (Locust Pose)
Each pose should be held for at least 8 breaths before slowly moving onto the next. Try for a deep stretch but traction or slight compression is okay too. This is an intensified practice, so don’t do anything that causes discomfort or severe pain. Modify any position if needed. Finish with some gentle stretching to release any residual tension.
Conclusion
All in all, there is no single solution for back pain. Doing various yoga sequences can make a big difference with your back pain. You can take back control of how your body feels. Consistent effort, plus different yoga postures, can bring long-term relief.
Tips for Lasting Relief
Transformative yoga is great for relieving back pain. You’ll see results with dedicated practice! To make sure the relief lasts, here are some tips to add to your yoga practice:
- Listen to your body. Be mindful of what poses and sequences feel like, and adjust if you need to.
- Exercise regularly. Have a combination of muscle-strengtheners, stretchers and relaxation poses. Try to do this 2-3 times a week for lasting relief.
- Improve your posture. Keep shoulders back and spine elongated. Strengthen core muscles with planks and bridges.
- Stretch thoroughly. Stretch all major muscles, paying more attention to hips, shoulders and hamstrings. Use props for extra help in poses such as Warrior 1 or Triangle.
- Mix yoga with other treatments. Massage therapy and chiropractic adjustments can maximize relief. Work with a pro to find out which activities are best for relief, short and long term.
Frequently Asked Questions
1. How can yoga sequences help relieve back pain?
Yoga sequences can help relieve back pain by improving flexibility, strength, and posture. They also reduce stress and tension in the body, which can contribute to back pain.
2. Can beginners practice transformative yoga sequences for back pain relief?
Yes, beginners can practice transformative yoga sequences for back pain relief, but it is recommended to start with gentle and simple poses and gradually progress to more challenging ones as their flexibility and strength improve.
3. Is it safe to practice transformative yoga sequences for back pain while pregnant?
It is best to consult with a healthcare provider before practicing any yoga sequences during pregnancy. Certain poses may need to be modified or avoided altogether.
4. How often should I practice transformative yoga sequences for back pain relief?
It is recommended to practice transformative yoga sequences for back pain relief at least 2-3 times a week. Consistency is key to experiencing lasting benefits.
5. Can yoga sequences alone completely eliminate back pain?
While yoga sequences can help manage and reduce back pain, they may not completely eliminate it. It is important to also address any underlying medical conditions and take a holistic approach to pain management.
6. What other benefits can I expect from practicing transformative yoga sequences for back pain relief?
In addition to pain relief, practicing transformative yoga sequences can improve overall physical fitness, mental clarity and focus, and promote relaxation and stress reduction.