Introduction
Back pain is a common issue for millions globally. Yoga is an awesome solution for spine health, mobility and strength. Certain poses can help to heal your spine and ease back pain. We will look into different yoga sequences for relieving back pain, and how they can restore your spine.
Overview of the Benefits of Yoga for Back Pain Relief
Many people with chronic back pain are turning to yoga. It’s an exercise focusing on stretching and strengthening the body. Also, it teaches relaxation, mindfulness and deep breathing. Doing yoga regularly can help restore spine mobility, reduce pain, and increase muscle flexibility and strength. It also helps with mental focus, better posture and more energy.
Yoga can be adapted to suit any level of fitness or ability. Doing it with breath awareness can bring relief from back pain, restore mobility and range of motion in the spine. Doing yoga postures increases joint strength, motor control and endurance.
This guide will explore how tailored yoga specifically for back pain can reduce tension, inflammation, ensure proper positioning and reduce discomfort. We’ll cover yogic principles, key poses for spine stability, posture health and self exploration.
Yoga Postures and Sequences
Yoga postures and sequences are great for restoring your spine. They can help to reduce back pain and improve posture. Let’s look at some of the best poses and sequences that target your entire spine. These can provide relief from various types of back pain. Read on to find out more!
Beginner Postures
Start with basic poses to focus on form and avoid injuries. Beginners may find it helpful to begin with poses that soothe and restore the spine without straining it.
Yoga offers various poses that can help with back pain. These include standing forward folds, quadricep stretches, and cat-cow stretch. The following can be especially effective for chronic back pain and will improve spinal mobility:
- Child’s Pose: This pose gently stretches the hips, thighs, and ankles while relieving tension in the lower back. Stretch your arms out and relax in this position.
- Cat/Cow Pose: This combo is great for alleviating pain between the shoulder blades or upper back. Do not twist or swing too quickly. Focus on deliberate movements.
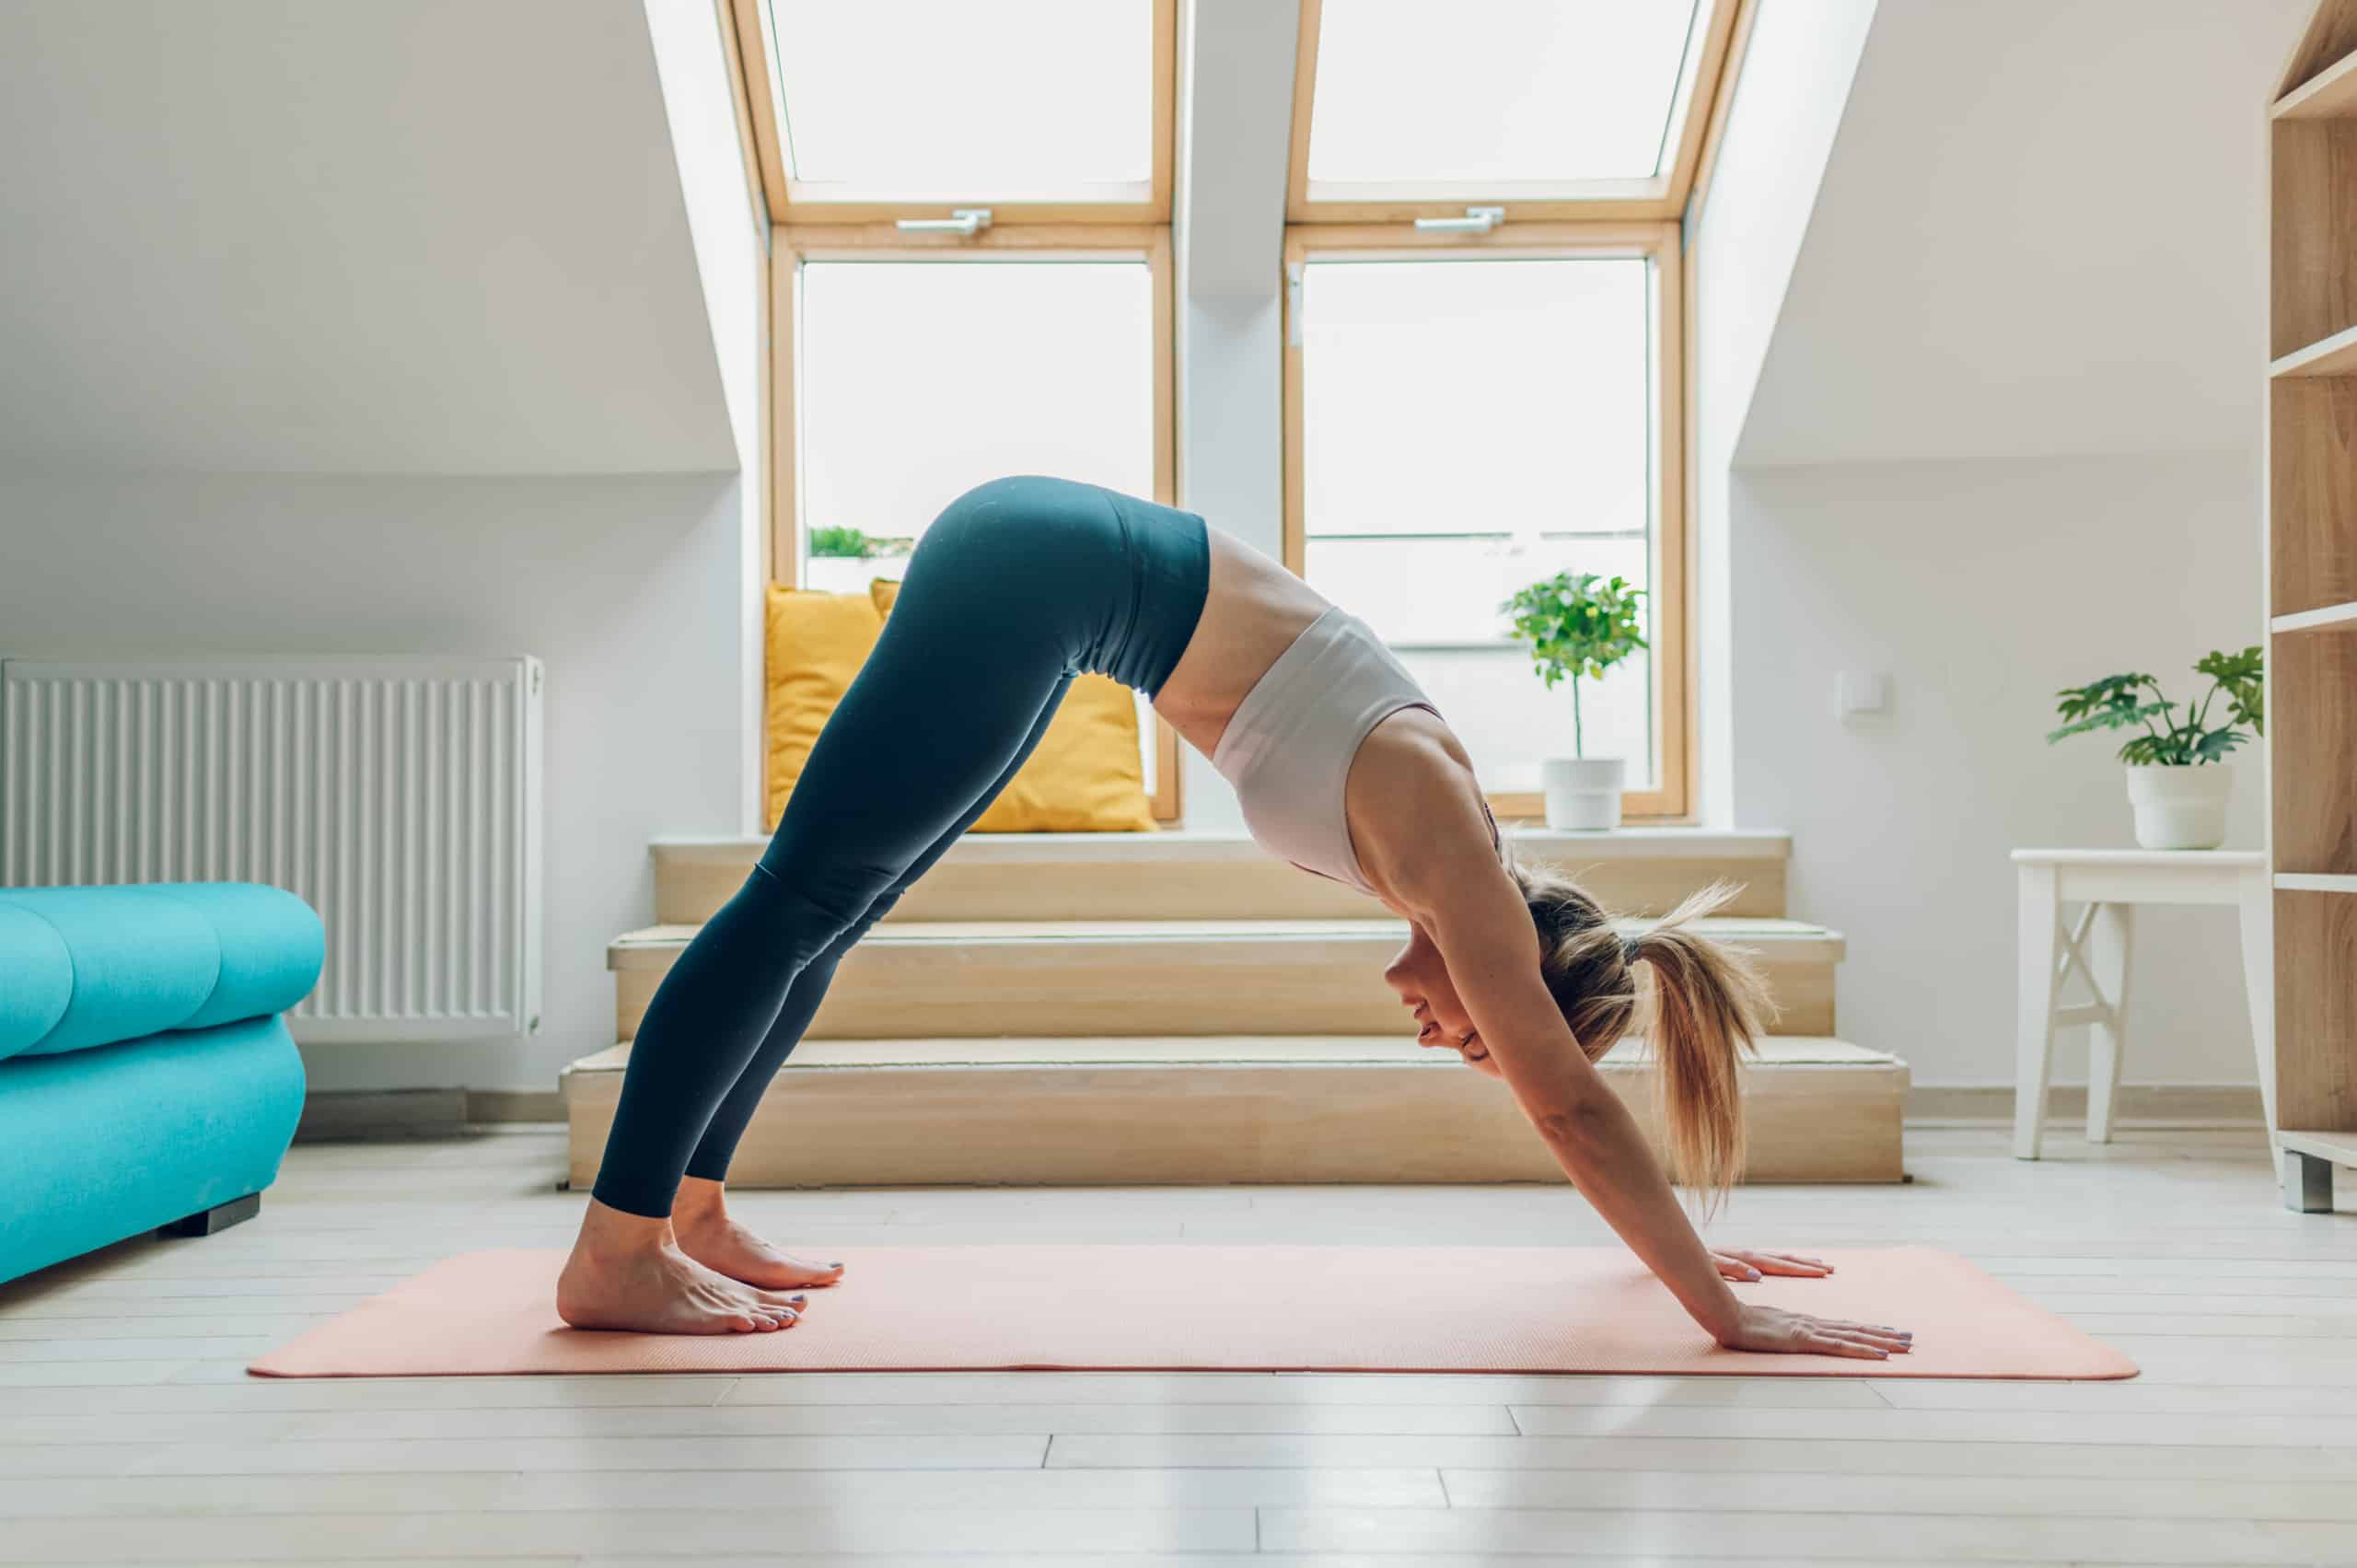
- Downward Facing Dog: This pose extends the entire spine, strengthens muscles, and brings relaxation. Breathe deeply throughout the posture for full oxygenated blood circulation.
- Asana Variations: Try variations of traditional poses with a block or bolster. It provides support without compromising flexibility. This will also improve spinal alignment for poses such as Side Plank or Upward Bow.
To get the most out of these movements, combine gentle stretches with mindful breathing. This will open energy meridians along the spine and relax the nervous system. If feeling sharp discomfort, stop immediately.
Cat-Cow
Cat-Cow is a pose pair that warms up and flexes the spine. It opens the chest and hips, and increases circulation. It builds strength for more challenging postures.
Start on hands and knees. Wrists in line with shoulders, fingers apart and knees in line with hips. On inhale, lift tailbone. Gaze towards ceiling. This is cow pose. On exhale, round back like a scared cat. This is cat pose. Repeat for five watermelon cycles.
- Inhale through nose. Fill both sides of rib cage evenly. Space between vertebrae.
- Exhale. Draw belly button back towards spine. Round curve of spine. Bring head down slightly. Feel rejuvenation.
Child’s Pose
Child’s Pose, or Balasana in Sanskrit, is a yoga posture. It’s great for restoring the spine and relieving pressure on the back. It has a calming effect and can be used between other postures or as a resting point.
To practice Child’s Pose, kneel on the floor with knees hip-width apart, toes touching. Fold forward so your belly is between your thighs. Stretch your arms in front or out to the sides. Stay for five breaths to allow time for the benefits. If needed, keep arms shoulder-width apart and palms up instead.
Downward Facing Dog
Downward Facing Dog (Adho Mukha Svanasana) is a popular yoga pose. It’s great for those with lower back pain. It stretches and strengthens the body, while decompressing and elongating the spine. Deep breathing helps relax into the pose.
To start, come onto all fours on your mat. Place wrists below shoulders and knees below hips. Tuck toes and raise hips towards the ceiling. Press evenly through palms and feet. Keep pressing until you reach the full Downward Dog.
Mayurasana (Peacock Pose) can help open tight areas. If it’s too extreme, use props such as blocks or blankets. This will still give the benefits without compressing any areas of discomfort.
Intermediate Postures
Intermediate postures come after mastering simpler, introductionary postures. They are tailored to individual needs, aiming to relieve back pain.
- Downward Facing Dog: A common yoga pose. Stretch your body from heels to head while keeping spine neutral and engaging core.
- Camel Pose (Ustrasana): Opens front of body, and strengthens core muscles and spine. Avoid arching beyond neutral alignment.
- Pigeon Pose: Open and lengthen hips with gentle twist to each side. Equal extension on both sides maximizes relief.
- Bridge Pose (Bandhasana): Strengthens back, and creates deep openness in hips. Find a balance between tension and relaxation.
- Fish Pose (Matsyasana): Use a block or a chair under bent knees for support. Avoid hyperextending over cervical vertebrae if neck is tight.
Bridge Pose
Bridge Pose, or Setu Bandha Sarvangasana, is an intermediate level Hatha yoga posture. It strengthens and stretches the spine. This pose is a gentle backbend. It restores spinal mobility and flexibility. It also relieves chronic lower back pain. It can be used for relaxing into deeper postures like Child’s Pose or Corpse Pose.
To do this pose, lie on your back. Bend your knees and plant your feet on the floor. Rest your arms by your sides. On an inhale, press your feet and lift your hips towards the ceiling. Keep your shoulders pressed down. If comfortable, slide your shoulder blades under and interlace your hands.
Stay in the pose for up to 5 minutes. Inhale to bring energy. Exhale to relax. When finished, bring awareness to your fingertips. Then release back down onto the ground with an easeful transition.
Locust Pose
Tap into the spine-strengthening benefits of locust pose, also known as Salabhasana in Sanskrit. This cobra-like posture activates your spine muscles. Here’s how to do it:
- Lie on your belly, feet on the floor, forehead resting on a mat or folded blanket. Place arms alongside body, palms facing down.
- Activate legs by engaging thighs and lightly pressing shins and feet into mat. Deepen breathing with each inhale and exhale.
- On an exhale, press pubis down and lift head and chest. Gently arch back like a cobra. Lift head up until chin touches throat. Press shoulder blades away from ears. Softly hug legs towards midline for inner support.
- Engage core muscles to protect lower back. Visualize spine lengthening with each inhale. Relax in between breaths. Root shoulder blades firmly against mat. Increase range of motion over time.
- To exit, slowly lower body onto the floor. Allow forehead to rest. Savour improved spinal strength.
Cobra Pose
Cobra pose, or Bhujangasana in Sanskrit, is great for stretching the back and reducing pain. It has variations for different levels of difficulty. Respect and understanding should be practiced when performing this pose.
Here’s how to do a basic cobra pose:
- Lie face down with legs straight and toes relaxed. Place palms on either side of the chest with elbows bent and close to body.
- Put equal pressure on both forearms and slowly press through them to lift the chest slightly off the floor. Avoid crunching the neck or straining the arms. If feeling pain, release tension until it’s relieved, and draw focus inward by connecting with breath.
- Hold up to 30 seconds then release back down onto mat with control. Do this set three times total (once per side).
- After completing, rest in Child’s Pose before continuing with other poses or movements.
Advanced Postures
Advanced yoga poses can transform your body, mind, and soul. They provide a wider range of motion, flexibility, strength, and balance. If you have already conquered basic postures, have been practicing yoga for a while, or just feel ready to take your practice to the next level, advanced postures can be an amazing way to reach deeper physical and spiritual exploration.
It is really important to be cautious when attempting advanced postures – always listen to your body if something doesn’t feel right. Slightly adjust if needed and make sure your practice is safe.
Here are some of the most popular advanced asanas:
- Headstand (Sirsasana): An inversion pose that needs core muscular strength, focus, and alignment.
- Shoulder Stand (Sarvangasana): A restorative pose with multiple health benefits, including better circulation.
- Plow Pose (Halasana): An inverted pose with calming effects on the body.
- Fish Pose (Matsyasana): A true backbend that opens the chest and stretches and strengthens the spine.
- Wheel Pose (Urdhva Dhanurasana): A stimulating pose with many variations depending on your flexibility.
- One Legged King Pigeon Posture (Eka Pada Rajakapotasana): An intense hip opener with numerous physical and spiritual advantages.
Bow Pose
Bow Pose, or Dhanurasana in Sanskrit, is an awesome back-strengthening yoga posture. It stretches your chest and tummy, plus gives your spine a dynamic massage. This pose also tones your abdominal organs and energizes your nervous system.
To do this pose correctly:
- Lie on your stomach.
- Exhale deeply.
- Bend both knees behind you.
- Reach back and hold your ankles or feet.
- Inhale.
- Lift your legs and chest off the ground.
- Press into your heels and draw them backward toward your arms.
- Hold for several breaths.
- Slowly lower yourself onto your stomach.
Be careful not to overexert yourself. This pose involves intense stretching of the spine, which can cause discomfort if done improperly. What’s more, Bow Pose strengthens back muscles and gives your mental clarity when practiced regularly as part of a yoga sequence.
Camel Pose
Camel Pose is a kneeling backbend. You can do it alone or as part of a sequence. It stretches the torso, thoracic spine, and shoulders. Plus, it strengthens the lower back.
To do it, kneel on your mat. Place your hands on your hips. Engage your core and pelvic floor muscles. As you inhale, press into your feet, lift up, and arch back. Reach for your heels. Make sure to keep space in between your lower ribs. This prevents overextension. At the peak of the pose, rest and relax. Then, slowly come out one vertebra at a time until you’re back on hands and knees.
Wheel Pose
Wheel Pose is a back-bending pose that tones the spinal muscles and opens the heart.
To practice this pose:
- Lie on your back.
- Bend knees, bring feet close to glutes.
- Place palms flat on floor, parallel with shoulders. Press down into arms and lift hips up off the mat.
- Extend and open chest backwards. Press down into feet for support, or walk up onto hands a bit more.
- Maintain position for 3-7 breaths.
- Exhale as lower down onto back.
This pose is good to incorporate into any series of postures that involve stretching out the spine, like cobra pose or fish pose. Listen to your body and don’t overdo it. Keep it light and easy to maximize benefits from this gentle yet powerful posture.
Breathwork
Breathwork is a must for any yoga routine – especially for relieving back pain. It relaxes muscles, boosts circulation, and decreases the pain’s intensity. Breathwork opens the chest and ribcage, which eases tension on the spine.
In this section, we’ll go over some breathwork practices to help restore your spine:
Ujjayi Breath
Ujjayi breath is key for restorative yoga. It helps realign the spine and gives relief from back pain. “Ujjayi” means “victorious” or “triumphant“. It stands for something that has gone through tough times and won in the end.
The ujjayi breath calms the mind and helps people focus on their body. It involves full inhalation and exhalation, with each breath held. This lets oxygen flow to tense areas, reducing pain.
Ujjayi breath is done through nose and mouth. This sends a wave-like effect through the spine, giving cells oxygen. As breathing returns to normal, it brings:
- Lightness
- Clarity
- Balance
- Better mood
- Flexibility
Ujjayi is a powerful breath work tool!
Nadi Shodhana
Nadi Shodhana, also known as alternate nostril breathing, is an ancient yogic breathing technique. It helps balance the brain’s left and right hemispheres. It also regulates the nervous system and reduces stress.
To practice it, sit in a comfortable pose like easy pose. Curl up your right hand towards your third eye area. Your index finger and thumb should form a slight hole. Place your ring finger on top of one side of your nostril. Then, press down lightly. Inhale deeply through the free side. Hold both sides shut for a few seconds or up to 30 seconds. Release through the opposite side and repeat. Inhale deeply again through one side before switching back. Do this for five rounds with each nostril. Finally, breathe deeply into both eyes at once as an inhale-exhale combination several times over.
Nadi Shodhana brings more oxygen into your system. It also restores calming energy around the spine, which can reduce pain or discomfort due to stress or environmental imbalances. Practicing regularly, even for a few minutes a day, may help you feel more relaxed throughout your whole body!
Kapalabhati Breath
Kapalabhati Breath, also known as Skull Shining Breath, is an energizing technique. In this, an active inhalation and a passive exhalation are used to quickly transfer life force throughout the body. It’s a “high-intensity breathing exercise“. But if you’re new to breathing exercises, don’t rush it – you may need to practice before you can exhale in a relaxed manner. Beginner practitioners should focus on controlling the exhalation part and use ‘simhasana’ or lion’s breath, where the inhale is kept after the cycle ends before moving to the next breath.
Kapalabhati Breath works fast and efficaciously to mobilize your spine and restore core strength. It helps the natural curl of your low back so that your abdominal muscles can offer support instead of straining against gravity. The active exhalations increase the blood flow towards your spine with each movement, supplying more nourishment to your nerves and discs and also eliminating energy from inactive body parts. With regular practice, Kapalabhati Breath can produce startling advantages such as improved flexibility and range of motion in the low back, allowing you to move more freely from that area during other activities throughout the day.
If discomfort arises, or if pain persists more than 24-48 hours after practice, stop immediately.
Relaxation
Chronic or acute back pain? Relaxation is the answer. Yoga is a great way to get your spine moving and balanced, plus it’s calming. We’ll explore how yoga sequences and poses can soothe your back pain. Relaxation through yoga – that’s the power!
Corpse Pose
Corpse Pose (Shavasana) is an ideal relaxation posture. It reduces stress, quiets the mind and boosts energy. It’s great for relieving lower back pain. Here’s how to do it:
- Lie flat on your back. Put your arms away from your body and your legs slightly apart.
- Take natural breaths. Don’t strain yourself.
- Soften your face, jaw and eyes. Relax your forehead and brow area. Breathe deeply into your abdominal muscles and pelvis. Let go of physical and mental tension.
- Stay in this pose for 5-10 minutes. Even breaths throughout. Then roll onto one side. Sit up slowly after a few moments of pause.
Guided Meditation
Meditation can be great for calming and restoring, especially if you have back pain. Guided meditation can help you take control of your emotions and physical sensations, reducing pain.
Guided meditation for back pain uses mindfulness – paying attention to your own internal world. This helps you stay in the present moment and not get attached to thoughts. People who use it often have more psychological balance, even with low-grade constant discomfort or flare-ups due to misalignment in the spine or other back injuries.
By combining movement with mindful presence, you can relax, soften core tension points, and breathe freely. Focusing on physical sensations related to back pain can help alleviate symptoms.
Yoga Nidra
Yoga Nidra, or “yogic sleep“, is a practice for conscious deep rest. You relax your body and close your eyes for 10-30 minutes. It helps calm the nervous system and reduce stress.
The physical part has two phases. First, breath exercises to relax the body. Then, guided imagery to deepen the relaxation and stillness.
Yoga Nidra has been proven to help with anxiety and depression. It can also restore balance, relax muscles, and soothe organs. It’s a nourishing practice for the spine and can help with back pain.
Conclusion
This article has shone a light on the usefulness of yoga for back pain relief. It’s possible to recover spinal mobility, improve posture, and increase flexibility by carrying out various poses and stretching the spine.
We discussed yoga sequences for back pain and their advantages. We hope that this article has provided you with the information and means to begin your own back pain relief journey.
Summary of the Benefits of Yoga for Back Pain Relief
Yoga can provide lots of benefits for your health and reduce back pain. It stretches and extends your spine, giving it alignment and muscle relaxation. It also improves circulation, lowers inflammation, and relaxes tense muscles. Plus, the deep breaths used in yoga increase the oxygen flow to the affected areas, boosting healing. With yoga sequences made to target back pain, you can get relief and better physical performance.
Yoga poses can make your posture stronger by working on your neck, upper-back, mid-back, and core muscles that support the spine. When these muscles are strong, they can hold your spine in the right position and decrease strain on the body during everyday activities. Also, holding poses for longer can stretch out your muscles and take away tension and increase mobility.
If you set aside some yoga time each week, you’ll start seeing results quickly! Yoga is especially helpful for chronic back pain when done regularly and consistently. Doing these movements regularly can make a difference in flexibility, strength, balance, and posture, leading to less aches – including back pain relief!
Frequently Asked Questions
Q: Can yoga really help relieve back pain?
A: Yes, practicing yoga can help relieve back pain by improving posture, increasing flexibility, and strengthening the muscles supporting the spine.
Q: What yoga poses are best for back pain relief?
A: Some of the best yoga poses for back pain relief include downward-facing dog, cat-cow stretch, child’s pose, cobra pose, and pigeon pose.
Q: Do I need to be flexible to practice yoga for back pain relief?
A: No, you do not need to be flexible to practice yoga for back pain relief. In fact, practicing yoga can help increase flexibility over time.
Q: How often should I practice yoga for back pain relief?
A: It is recommended to practice yoga for back pain relief at least 2-3 times per week. Consistency is key for seeing the benefits of yoga for back pain relief.
Q: Can I practice yoga for back pain relief if I have a pre-existing condition or injury?
A: It is important to consult with a healthcare professional before practicing yoga if you have a pre-existing condition or injury. However, yoga can often be adapted to accommodate various injuries and conditions.
Q: Do I need any special equipment to practice yoga for back pain relief?
A: You do not necessarily need any special equipment to practice yoga for back pain relief. However, a yoga mat and some props such as blocks and straps may be helpful in supporting your practice.


